

All modern businesses need a complementing online presence – especially restaurants. Having your own website can help you showcase what makes your restaurant special and why people should invest time and money over there.
You can showcase all the different cuisines that you offer, the interior decorum, the overall aesthetics, and much more. And once you got them hooked and craving for a dine out at your place, you can seal the deal by implementing a reservation system right into your website.
Now all of these might seem overwhelming, but don’t fear, as all of this can be easily managed with WordPress – the leading content management system in the market. With WordPress, you can easily set up a website of your dreams and bestow it with relevant features by simply installing plugins.
For the purpose of this read, we will be taking a look at ReDi – a restaurant reservation plugin. It is filled with awesome features that both you as well as customers will love. So without further ado, here is a quick look at the plugin.
ReDi – An Overview
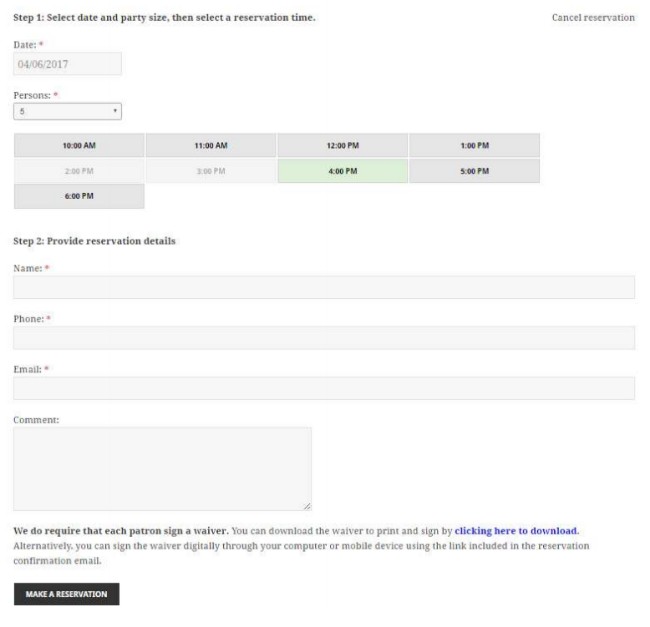
The ReDi Restaurant Reservation plugin enables the option to take online reservations from your website. Online customers can come in and make reservations; you will receive notification on each of these reservations as well as manage all of them simply by sitting on your desk.
All the available spaces and times are present to the customers, they are free to choose which slot to pick, and once done, the reservation is made. All you need to do is simply enter the number of persons that can book at one time, and set details about your restaurant, as well as working times, and you are all set.
So, if you like the overall idea behind the plugin, a more detailed overview of its features follows:
ReDi – Plugin Installation
If you currently run a WordPress website, then can install ReDi just like any other WordPress plugin. However, if you are new to WordPress, then here is a step by step rundown of the plugin installation process.
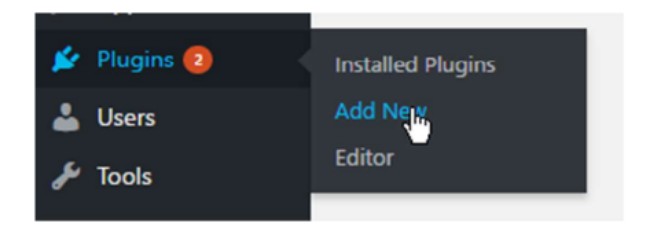
First head on over to the WordPress Dashboard, click on Plugins, and then on Add New. Now you will notice a search bar to the upper left of the screen. Here type “ReDi Restaurant Reservations.” A host of plugins will show up down below.
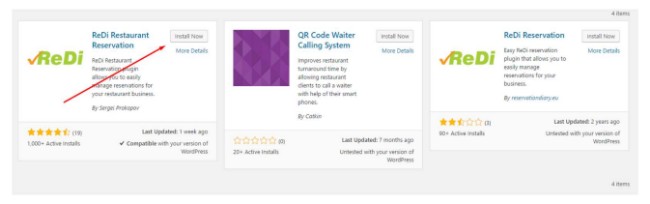
Install the latest version of the plugin by hitting the Install Now button followed by the clicking the Activate button.
Once activated a new “Reservation” page will show up on your dashboard. There will be shortcode [redirestaurant] within the newly created “Reservation” page. You can customize the position of your reservation form by moving this shortcode to any desired location.
ReDi – Features
ReDi Restaurant Reservation Plugin is designed to help your customers make table reservations for your restaurant and to help you to manage all the reservations. All the features that are provided with the plugin are developed to cater to this specific need. Here is a more detailed rundown of all the features that the plugin has to offer:
- You will be able to access all reservations through your mobile phone, tablet, or PC. It is advised that you keep this page open all times on a tablet or PC so that the hostess can view all the upcoming reservations. The page auto-refreshes every 15 mins and. It also shows all the reservations that are past 3 hours and also one’s that are too come in the next 24 hours. Clicking on a particular reservation will open additional details.
- Option to set a limit on the minimum number of person allowed to make a single reservation.
- Option to set a limit on the maximum number of person allowed to make a single reservation.
- Large group message warning which can be set if the customer chooses a large number of people for the reservation surpassing the maximum limit.
- Option to allocate the reservation time, a time frame for which your customers are reserving a particular table.
- Option to turn on Manual Reservation which allows you to confirm all the reservations that are coming manually. This is useful in case you want to avoid spams or control the number of incoming reservations.
- You can also limit your customers into choosing reservation times that are set according to every hour or by every half an hour.
- Option to send confirmation emails to clients once a reservation request has been approved.
- You can limit early booking of tables at your restaurant by some days of your choice.
- You can configure two ways in which the available hours can be displayed. Either you can allow users to select any time of the day, and let the system cross check if that time is available or not. Or you can restrict the user to only choose from the available time slots.
- There are also two different calendar types. It is up to your which you choose for your customer’s convenience.
- There are even two different time pickers you can set for your users. One time picker has your users slide a bar to select their desired time slot, whereas the other has them choose from a drop-down box.
- There are also options to add custom fields in case you want to add extra fields to be filled by your customers. You can also specify these extra fields as necessary and required to be filled.
- Next comes the restaurant settings which gives you the option to set the place of your restaurant, a current place ID, restaurant name, country, city, address, Restaurant URL, Email and Email CC, Phone Number, a Restaurant Description, Catalog, maximum number of guests and so on.
- Late Booking feature, which if turned on, will force your customers to choose a timeslot which is set at a minimum of 20 hours from the time of making the reservation.
- Then there is the option to specify the working time of your restaurant.
- And last but not the least, you get API keys, which you have to keep in handy. This will help to identify your account and help in troubleshooting.
Apart from these, there are other additional services which you can add on by request:
- You can use your Facebook account for your business which will help increase your Facebook fan base.
- There are many white labeled restaurant reservation application for Facebook Applications and other mobile applications to which you can get access.
- There are also many Facebook integrated services which provide you with profile pictures of your customers, so you can greet him/her when they arrive at your restaurant.
- Option to remind customers about upcoming reservation through email or SMS.
- Ability to collect prepayment for a reservation.
And much more…
ReDi – How to Use
By now, if you have gained an interest in all the features and potential of this plugin, let’s take a look at how to use it.
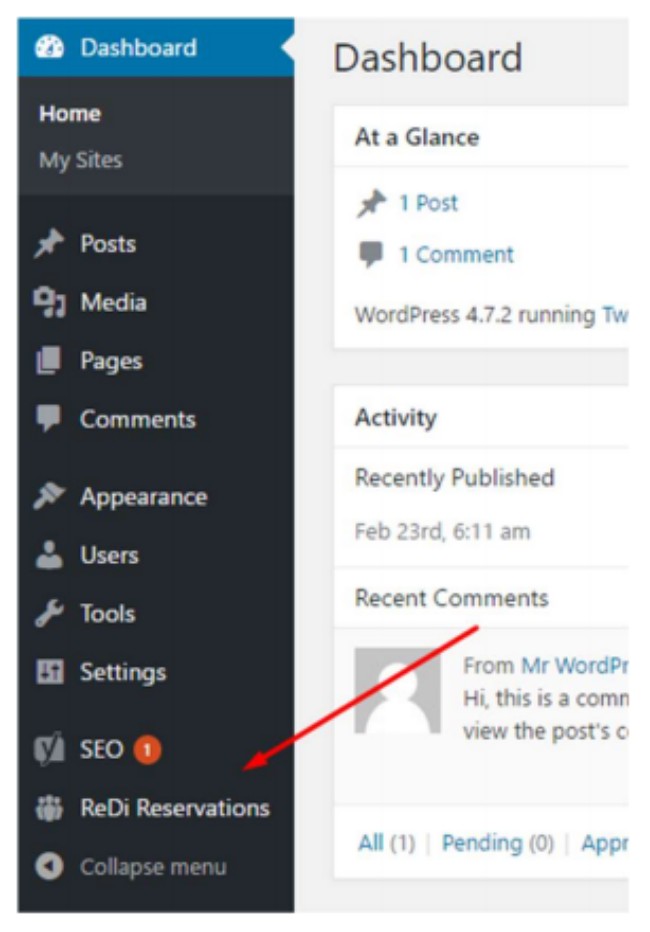
After the plugin has been activated, a “ReDi Reservation” option should show up in the WordPress dashboard main navigation menu. Clicking here, you will gain access to all the features provided by the plugin.
On the homepage, you will get a one glance view of all the reservations, whether they are pending, approved, rejected or upcoming. Now, if you want to tweak around with the settings, then there are two different settings pages depending on your pricing plan. There are the free package and the basic package which falls under a price of 5 EUR per month. Both packages come with different sets of settings and options to give you more control over the plugin.
In Conclusion
So this has been our review of ReDi Restaurant Reservation plugin for WordPress. As you can see, it boasts a comprehensive solution to help you include a reservation taking feature on your WordPress powered restaurant website. With all its powerful features, you get control over every aspect of the reservation making, as well as canceling process.
If you found this read helpful, do pass it along to friends who may find it helpful as well. Also, if you currently use the plugin for your own purposes, then don’t forget to write about your experience with the plugin in the comments section. Others will love to get some insight from a fellow reader.
Leave a Reply